 Yard Models Yard Models view Actions Open Yard Editor Yard Editor view Click the Reference Point tool Click the map where you want to add a reference point Add Reference Point form
Models Yard Models Yard Models view Actions Open Yard Editor Yard Editor view Click the Reference Point tool Click the map where you want to add a reference point Add Reference Point form
A reference point consists of longitude and latitude information. These coordinates define the existence of that specific point in physical space.
Use the Reference Point form to add reference points to your yard map. Adding and establishing reference points is a prerequisite for drawing the yard perimeter or adding entities to the map.
The base layer of the yard map contains a series of tiled raster images which N4 must convert between the map's coordinate system and the geodetic coordinate system. Reference points serve to find the conversion factors between the map and the geographic coordinates and the correlate points on the uploaded yard map (on page 1) with geographic points on the globe.
N4 requires two reference points to orientate the map and calculate the necessary conversions between the Cartesian coordinate system. These reference points are located at opposite ends of the yard. At the very least, they must have different longitude and latitude coordinates. West longitude and South latitude take on negative values.
N4 uses the following coordinate systems:
Map coordinate system (pixels)
Geodetic coordinate system (latitude and longitude)
Yard coordinate system (centimeters)
You can find the latitude and longitude of two points in your yard using free web-based utilities that allow you to enter an address, and then drag and drop the marker to pinpoint different points. At the time of this publication, one example of such a tool could be found at http://itouchmap.com/latlong.html. Google Maps Labs also has a feature you can turn on to give latitude and longitude upon right-clicking a point on a Google map.
South latitude and West longitude coordinates must take on a negative value when you enter them in the Reference Point form (on page 1). If your site uses a GPS system, Navis recommends that you perform a GPS survey to receive accurate point information (with a deviation of up to 6 inches or about 15 cm).
Before you begin:
Understand that:
to update or revise reference points to a map, you must first delete the existing reference points and then add new reference points. See Delete reference points (on page 1).
numbers are processed based on the American notation using decimal points, not commas. Use a decimal point in the latitude and longitude values, not a comma. For example, if you use a comma, as in Latitude = 34,062211, N4 gives a validation error saying that the entered number is not allowed for Latitude.
Before you set reference points on an image map in Yard Editor, when you convert them from degrees, it is better to retain more precision after the decimal point. This action can greatly improve the accuracy of the further calculations that N4 performs when you place an element in the yard. For example, if the latitude coordinate for reference point 1 is located at 53 degrees, 32 minutes, and 21.1596 seconds, calculate and use it as follows, without rounding to a position close to the decimal point:
53 + (32/60) + (21.1596/60/60) = 53.5392109666
When you set reference points, it is crucial that they intersect with the actual points on the image map that they represent. Otherwise, yard elements may not properly overlay the image. In the following example, the reference points are set inaccurately. Their accurate location would be the spots indicated in green, located on the corners of the yard.
Example: Inaccurately set reference points

To achieve this degree of accuracy, you must zoom in to the highest level in Yard Editor to see the corners of the yard and the reference points. Remember that, ideally, reference points are located at opposite ends of the yard. At the very least, they must have different latitude and longitude coordinates, and also note that both West longitude and South latitude take on negative values. The image you use should allow at least five levels of zooming. Otherwise, the image might not scale well with the block polygons.
Lastly, some image maps show spaces between rows and columns. This spacing is most common for straddle lanes. You can configure this spacing when adding or editing the stack block (for details, see the Specs tab (on page 1) in the Stack Block form (on page 1)). When the spacing is set up correctly, the block polygon should properly overlay the block on the image map.
The following example shows the same yard block twice: In the first instance, the block drawn in the Yard Editor does not properly overlay the block on the map. In the second instance, after editing of the spacing between rows and columns, the overlay appears much cleaner.
Example: Comparison of improper (top) and proper (bottom) overlay
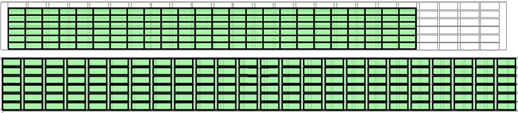
If the space between rows is not uniform in the image itself, the block polygon may not be properly oriented even after you have adjusted the space between rows and columns. This orientation problem occurs because the Yard Editor adds spaces uniformly.
To set reference points:
In Yard Editor, select  (the Set Reference Tool).
On the yard map, click where you want to place the reference point.
N4 places a little red target on the map and opens the Reference Point form.
When you place the reference point on the map, N4 automatically assigns x-axis and y-axis values to it.
In the Reference Point form, in the Latitude and Longitude fields, enter the exact coordinates. Make sure to use negative numbers for West and South longitude values.
Click Save.
When both reference points are defined,  (the Draw Yard Path tool) is displayed.
Next step(s):
Draw the yard perimeter (on page 1)